
First Posted, 29 Aug 2007, updated 9 Nov 2007
After our massive move from New Orleans to Natchitoches, Louisiana following hurricane Katrina, Bonnie and I finally got things started on building our "playhouse," which will be a combination storage building, art studio and ham shack. When complete, it will be a 30' X 60' all metal building, divided into three sections. It will have individual climate control for each section, accomplished by using some window air conditioners, which we got at a good price. (You should see the look on the salesman's face when you walk up to him and say: "I'll take six of those, please!")
After a lengthy delay caused by an excessive amount of rain just as we were slated to begin the foundation work (it figures...) we finally got the ground cleared, the fill dirt hauled in and graded. After waiting for it to settle properly, construction on the concrete slab for the structure began.
Foundation boards have been set in place to mark the outer edges of the slab, and the footing trenches have been started. Because of the large amount of fill required, the footing trenches have been dug all the way down to the undisturbed earth below. Additional fill will have to be put in the area and distributed by hand to get the ground surface level in preparation for the concrete pour.
This picture was taken from the end of the slab closest to the road, looking to the North-East. The sunlit area is the end where the art studio will be. Two windows on the sunlit side will provide a pleasant outside view. The ham shack will be in the center third of the building, and the storage area will be in the end closest to the camera position. A roll-up garage door will be placed right about where I was standing when I took this picture.

The conduit directly in front of the camera is 4" ID and will be used to get various cables and wired from the new building and the house. Since you never seem to have enough space inside a conduit, I opted for a big one - just in case. A length of 3/8" diameter braided poly line will be left in place through the conduit to pull wires through it at a later date. Note that when you are trying to pull additional wires through a conduit, if you use a braided rope, it does not tend to twist and get bound up between the existing wires as a twisted strand rope tends to want to do.
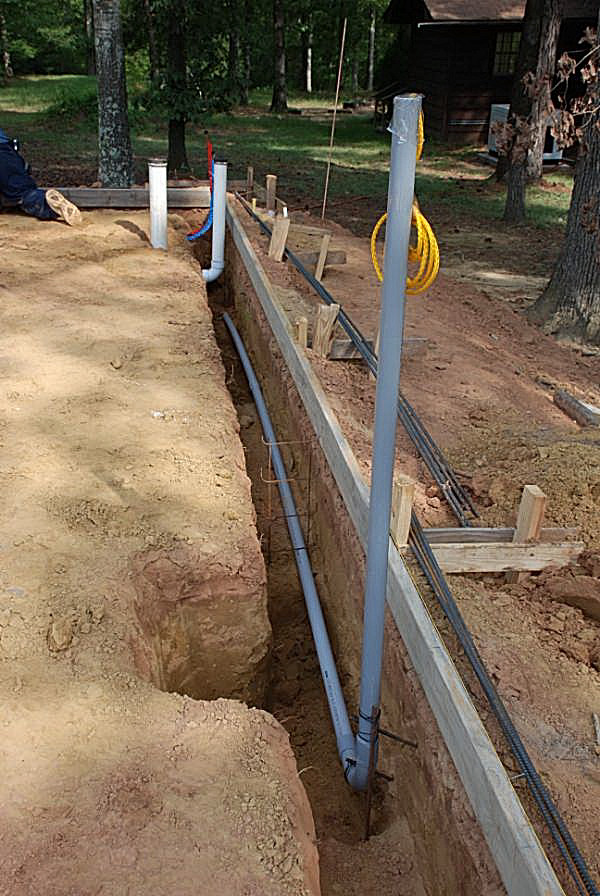
This is the conduit for the main electrical feed to the building. It is 2 - 1/2" conduit. I plan to install a 125 Amp service to the building, which should be sufficient for the planned loads. The underground feeder wire will handle 150 Amps, so there's some overhead built in. I used the larger wire to reduce the voltage drop under load. The building will be connected through the main house automatic transfer switch, so both the house and the new building will be on the 27 KW emergency generator. The total electrical load of the house and new building, when added together, is less than the main service drop to the house is rated for. The steel rebar for the footings has not yet been set in place - you can see it laying on the ground just outside of the form boards.

"Did he really do that??!?" Yep; I really did - what I did was to take that 2 - 1/2" conduit and drive it through about 8 feet of dirt with a sledge hammer. At the time, it seemed like less work than trenching through the foundation dirt to put the conduit in place. After I did it, though, I had second thoughts. On the bright side, at least the fill dirt is relatively undisturbed.

I drove an 8 foot ground rod into the earth below the footing, and connected the steel rebar to the ground rod. This ground will also connect to the building frame. There's another ground rod on the other side of the building that will connect to the building frame, and also to the ham radio gear. All the electrical hardware seen here is rated for burial in concrete.

We're getting closer! The rebar is in place, the plastic is down, and the wire mesh is in place. All that remains is to set the "J" bolts for the building columns and pour the concrete. Now, if it just does not rain tonight...

A view from the East - Northeast corner - Note the driveway slopes down from the road (right) to the house (left). This required that we place a LOT of fill dirt under this end of the slab.

Here, I swung the camera about 45 degrees to the left from the viewpoint in the previous photo. I also stepped back about 30 feet to the "natural" ground level. The lens of the camera is level with the top of the slab. You can see how much higher this end of the building will be than the house.
Because the natural grade is so smoothly and gently sloped, there is an optical illusion that makes the slab look like it is tilted. Not so, though, because after the slab was finished, flooding it with water results in an even film of water across the entire slab.

The next morning, promptly at 0700, the first of five truckloads of concrete rolled up to the job site. See that gray sky? We were worried about the possibility of rain, which is not a Good Thing when you have fresh concrete on the ground! Luckily, our worries were unfounded, and we had no rain this day, or the next, either.

First pour! We started in the back, where the footings were the deepest. A truckload of concrete disappeared into the ground very quickly. Talk about throwing your money into a hole! We sure were doing it today!!

The second truckload of mix vanished almost as fast at the first one.

By the third truckload, the guys had enough to work with to be able to get down to some serious, hard work.

Wow! It's looking good. I'm always a bit edgy anytime I have to do concrete work - especially if I'm paying for it - but these guys knew their jobs, and the project went along smoothly and rapidly. At this stage, everyone is taking a break, waiting for the mix to set up enough to do the finishing of the surface.

Finally, after things set a bit, we see the nice, smooth surface being prepared on the South-West side of the slab. At this point, the job is just about done. Now, all we need to do is keep our fingers crossed that the rain holds off another three hours or so. (It did.)

The finished product. After the surface had hardened sufficiently, a pair of lawn sprinklers were placed on the slab and turned on, to provide cooling water for the surface of the curing concrete. This prevents excessive water evaporation from the the hardening concrete and prevents surface cracks (Spider cracks) form appearing.
Several months pass...
OK... The slab sat and cured nicely, for much too long, as the contractor apparently got too busy to get the building assembled. Finally, some work began, as the following pictures will show.

Finally! Some steel is on the slab and is slowly being erected. Maybe we'll have a building in place before Thanksgiving. Well, maybe by Christmas. Note that I didn't say which year!

There's a lot more to do, but at least they've started to put it all together.

Most of the framework will be welded together, rather than bolted.

A view from the house garage out to the slab of the new building. I have started installation of a 4" diameter PVC conduit between the garage and the new building to use for whatever wires and cables I will need to run between the buildings. Unfortunately, because of some large tree roots, I cannot make the conduit lay exactly straight in the ground. It will also have to be buried at a shallow depth because of the roots.

Looking from the slab of the new building back to the garage.
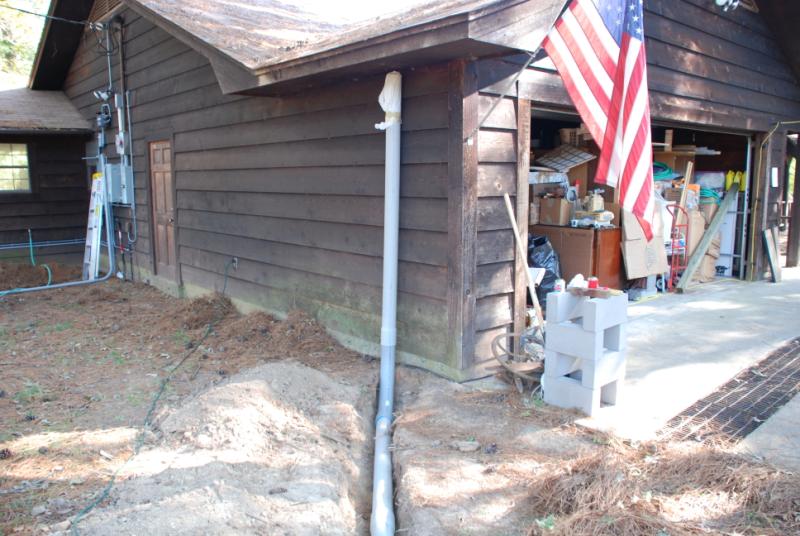
The conduit comes out of the ground against the garage wall. The vertical conduit section is only temporary. The conduit will not go that high, but will enter a box attached to the wall of the garage at a spot about 3 feet from the ground. wires from the conduit will enter the garage at that point. They will go up to the garage attic, and then to the house attic for distribution to their final destinations.

This is part of the trench for the underground electrical feeder for the new building. Note the very numerous tree roots visible in the trenches. If you are in need of any roots, we have them!

Here's a picture of my grandson, Nicholas, who's busy helping me fill in the trench after putting the feeder cable in place. He's a hard worker. I think he moved about 500 pounds of earth that day - and, he helped me pull the feeder cable through the conduit under the slab.
More as it happens...
73, W5JGV & KB5YSE